1.5 用Spring Boot构建一个微服务
I’ve always had the opinion that a software development framework is well thoughtout and easy to use if it passes what I affectionately call the “Carnell Monkey Test.” If a monkey like me (the author) can figure out a framework in 10 minutes or less, it has promise. That’s how I felt the first time I wrote a sample Spring Boot service. I want you to have to the same experience and joy, so let’s take a minute to see how to write a simple “Hello World” REST-service using Spring Boot.
我总是持着这么一个观点:一个软件开发框架是经过仔细考虑的,而且如果它经过了卡内尔猴子测试(译者注:Carnell Monkey Test,作者对它的昵称)的话,那么它应该是易用的。如果一个首次接触的人可以在十分钟之内弄明白一个框架,那么它就保证了易用性这一点。我第一次写Spring Boot服务示例时就感受到了这点。我希望你也有相同感受和乐趣,所以我们花一分钟来看看如何用Spring Boot写一个简单的”Hello World”REST服务。
In this section, we’re not going to do a detailed walkthrough of much of the code presented. Our goal is to give you a taste of writing a Spring Boot service. We’ll go into much more detail in chapter 2.
在本节里,我们不会过多深入研究展示出来的代码。我们的目的是让你体验一下编写一个Spring Boot服务。我们将在第2章进行更细致的讨论。
Figure 1.3 shows what your service is going to do and the general flow of how Spring Boot microservice will process a user’s request.
图1.3展示了你的服务将要做什么,以及一般情况下Spring Boot微服务是如何处理用户的请求的。
This example is by no means exhaustive or even illustrative of how you should build a production-level microservice, but it should cause you to take a pause because of how little code it took to write it. We’re not going to go through how to set up the project build files or the details of the code until chapter 2. If you’d like to see the Maven pom.xml file and the actual code, you can find it in the chapter 1 section of the downloadable code. All the source code for chapter 1 can be retrieved from the GitHub repository for the book at https://github.com/carnellj/spmia-chapter1.
这个例子并不是完整详尽的,它甚至无法告诉你应该如何构建一个生产级别的微服务,但它应该能让你愣住一会,因为它需要写的代码是如此之少。在进入到第2章之前,我们将不进行关于如何建立项目构建文件或者代码细节的讨论。如果你想看Maven的pom.xml文件以及完整的代码,你可以在第1章节的代码里找到。第1章的所有源代码都可以从本书的Github仓库里获取,地址是https://github.com/carnellj/spmia-chapter1。
NOTE Please make sure you read appendix A before you try to run the code examples for the chapters in this book. Appendix A covers the general project layout of all the projects in the book, how to run the build scripts, and how to fire up the Docker environment. The code examples in this chapter are simple and designed to be run natively right from your desktop without the information in additional chapters. However, in later chapters you’ll quickly begin using Docker to run all the services and infrastructure used in this book. Don’t go too far into the book without reading appendix A on setting up your desktop environment.
注意 在运行本书的代码前请先确保阅读了附录A。附录A涵盖的内容有,本书所有项目的通用项目结构,如何运行构建脚本以及如何启动Docker环境。本章的样例代码很简单,而且它就是被设计成可以直接在你的本机桌面上运行,用不到其它章节的知识。但是,后面的章节你将通过Docker快速启动所有的服务以及书中用到的基础组件。在继续往下读之前,请先阅读附录A,学习如何设置桌面环境。
 Figure 1.3 Spring Boot abstracts away the common REST microservice task (routing to business logic, parsing HTTP parameters from the URL, mapping JSON to/from Java Objects), and lets the developer focus on the business logic for the service.
图1.3 Spring Boot将通用的REST微服务任务进行了抽象(包括路由到业务逻辑,从URL里解析HTTP参数,将JSON和Java对象进行相互映射),从而让开发者专注于服务的业务逻辑。
For this example, you’re going to have a single Java class called simpleservice/src/com/thoughtmechanix/application/simpleservice/Application.java that will be used to expose a REST endpoint called /hello.
在这个例子中,你将看到一个Java类,其类名路径为simpleservice/src/com/thoughtmechanix/application/simpleservice/Application.java,它将被用来暴露一个叫/hello的REST端点。
The following listing shows the code for Application.java.
下面是Application.java的代码。
// Listing 1.1 Hello World with Spring Boot: a simple Spring microservice
package com.thoughtmechanix.simpleservice;
import org.springframework.boot.SpringApplication;
import org.springframework.boot.autoconfigure.SpringBootApplication;
import org.springframework.web.bind.annotation.RequestMapping;
import org.springframework.web.bind.annotation.RequestMethod;
import org.springframework.web.bind.annotation.RestController;
import org.springframework.web.bind.annotation.PathVariable;

@SpringBootApplication // 告诉Spring Boot框架这个类是Spring Boot服务的入口
@RestController        // 告诉Spring Boot你将把这个类的代码暴露为一个Spring RestController类
@RequestMapping(value="hello")    // 所有暴露给这个应用的URL将以/hello开头
public class Application {
    public static void main(String[] args) {
        SpringApplication.run(Application.class, args);
    }
    // Spring Boot将把这个端口暴露为一个基于GET方法的REST端口,这个端口
    // 接收两个参数:firstName和lastName
    @RequestMapping(value="/{firstName}/{lastName}", method = RequestMethod.GET)
    // 将传入URL的参数firstName和lastName映射为传给hello函数的两个变量
    public String hello( @PathVariable("firstName") String firstName,
                         @PathVariable("lastName") String lastName) {
        // 返回一个手工构建的JSON字符串。在第2章里你将不用创建任何JSON
        return String.format("{\"message\":\"Hello %s %s\"}", firstName, lastName);
    }

}
In listing 1.1 you’re basically exposing a single GET HTTP endpoint that will take two parameters (firstName and lastName) on the URL and then return a simple JSON string that has a payload containing the message “Hello firstName lastName”. If you were to call the endpoint /hello/john/carnell on your service (which I’ll show shortly) the return of the call would be
在列表1.1里,你暴露了一个GET HTTP的端点,这个端点接收了URL上的两个参数(firstName和lastName),然后返回一个简单的JSON字符串,它的内容为“Hello firstName lastName”。如果你在你的服务上调用了端点/hello/john/carnell,那么返回的内容将会是以下这样的:
{"message":"Hello john carnell"}
Let’s fire up your service. To do this, go to the command prompt and issue the following command:
下面我们来启动服务。打开命令行,输入以下命令:
mvn spring-boot:run
This command, mvn, will use a Spring Boot plug-in to start the application using an embedded Tomcat server.
这条mvn命令将通过Spring Boot插件来启动内嵌了Tomcat服务器的应用。
Java vs. Groovy and Maven vs. Gradle(Java vs. Groovy和Maven vs. Gradle)
The Spring Boot framework has strong support for both Java and the Groovy programming languages. You can build microservices with Groovy and no project setup. Spring Boot also supports both Maven and the Gradle build tools. I’ve limited the examples in this book to Java and Maven. As a long-time Groovy and Gradle aficionado, I have a healthy respect for the language and the build tool, but to keep the book manageable and the material focused, I’ve chosen to go with Java and Maven to reach the largest audience possible.
Spring Boot框架同时对Java和Groovy提供了强有力的支持。你可以用Groovy构建微服务,而且不用建立项目。Spring Boot也同时支持了Maven和Gradle两种构建工具。在本书中,我将采用Java和Maven。作为一个Groovy和Gradle的忠实粉丝,我很尊重这门语言和这个构建工具,但为了让这本书便于管理以及专注于内容,我选用了Java和Maven,以便能让更多读者阅读本书。
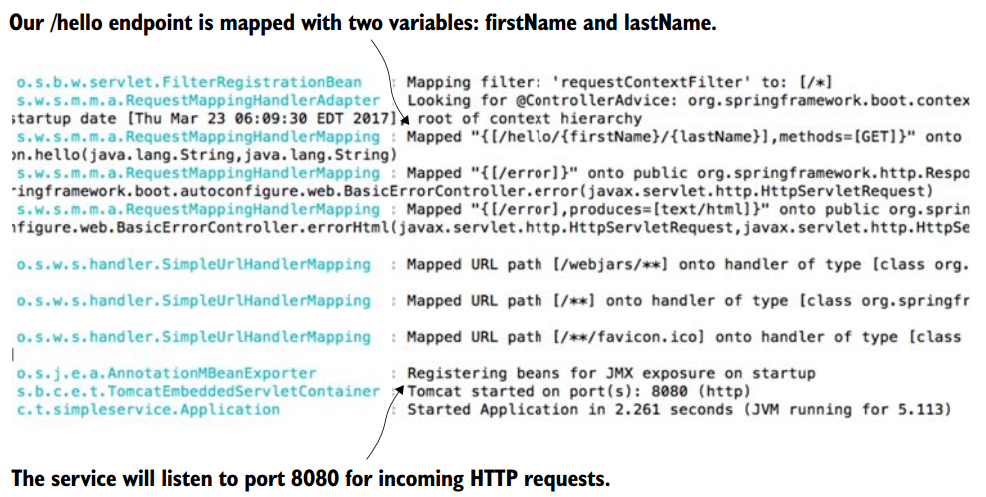 Figure 1.4 Your Spring Boot service will communicate the endpoints exposed and the port of the service via the console.
图1.4 你的Spring Boot服务启动时将在控制台将输出暴露的端点以及服务的端口号。(服务将将监听并处理8080端口进来的HTTP请求,/hello端点映射了两个变量:firstName和lastName。——译者注)
If everything starts correctly, you should see what’s shown in figure 1.4 from your command-line window.
如果启动时一切都正常的话,你将从你的命令行窗口看到图1.4展示的内容。
If you examine the screen in figure 1.4, you’ll notice two things. First, a Tomcat server was started on port 8080. Second, a GET endpoint of /hello/{firstName}/{lastName} is exposed on the server.
如果你仔细看图1.4,你将发现两个现象。第一,Tomcat服务器启动在8080端口上。第二,一个GET方法的端点/hello/{firstName}/{lastName}暴露在服务上。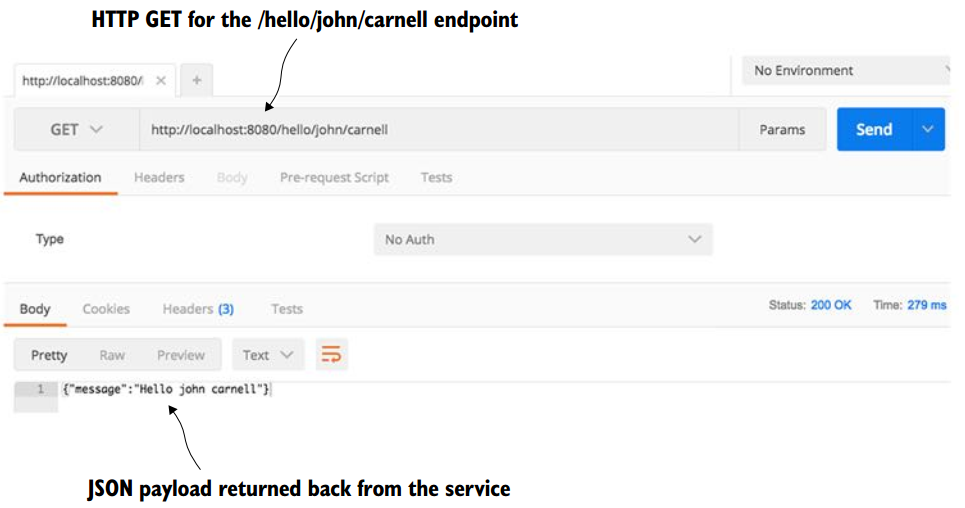 Figure 1.5 The response from the /hello endpoint shows the data you’ve requested represented as a JSON payload.
图1.5 /hello端点的响应以JSON格式展示了你请求的结果。
You’re going to call your service using a browser-based REST tool called POSTMAN (https://www.getpostman.com/). Many tools, both graphical and command line, are available for invoking a REST-based service, but I’ll use POSTMAN for all my examples in this book. Figure 1.5 shows the POSTMAN call to the http://localhost:8080/hello/john/carnell endpoint and the results returned from the service.
你将通过使用一个基于浏览器的REST工具,POSTMAN(https://www.getpostman.com/),来调用你的服务。
很多工具,无论是图形界面的还是命令行的,都可以调用基于REST的服务,但对于本书的所有例子,我将采用POSTMAN。
图1.5展示了POSTMAN调用http://localhost:8080/hello/john/carnell端点,然后服务返回结果的过程。
Obviously, this simple example doesn’t demonstrate the full power of Spring Boot. But what it should show is that you can write a full HTTP JSON REST-based service with route-mapping of URL and parameters in Java with as few as 25 lines of code. As any experienced Java developer will tell you, writing anything meaningful in 25 lines of code in Java is extremely difficult. Java, while being a powerful language, has acquired a reputation of being wordy compared to other languages.
很明显,这个简单的例子并没有显示出Spring Boot真正强大之处。但它展现了你可以仅用25行代码写出一个完整的 基于REST的HTTP JSON服务,并且将URL和Java参数进行路径映射。就像很多有经验的Java程序员将会告诉你的那样,想在25行的Java代码里写一个有意义的东西是十分困难的。Java虽然是一门强大的语言,但比起其他语言,它还是显得啰嗦。
We’re done with our brief tour of Spring Boot. We now have to ask this question: because we can write our applications using a microservice approach, does this mean we should? In the next section, we’ll walk through why and when a microservice approach is justified for building your applications.
我们结束了简短的Spring Boot之旅。现在,我们要问这么一个问题:我们采用微服务的方式来编写我们的应用,但这种方式是应该的吗?在下一节里,我们将学习为什么以及什么时候适合用微服务的方式来构建应用。